How to Make Bolillios: A Step-by-Step Guide
There’s something quietly magical about baking bread at home. It’s not just about the ingredients—flour, water, yeast, and salt—but about the transformation that happens along the way. Few breads capture that transformation quite like bolillos, the beloved Mexican rolls with their crisp golden crust and soft, airy interior. Whether served alongside a steaming bowl of soup, stuffed into a sandwich, or simply enjoyed warm with a smear of butter, bolillos are a staple that bring comfort, nostalgia, and flavor to the table.
If you’ve never made bolillos from scratch, you might assume they’re complicated. Their bakery-perfect appearance—with that signature oval shape and delicate split along the top—can be intimidating. But the truth is, making bolillos at home is not only achievable, it’s deeply rewarding. Once you understand the process, you’ll find yourself coming back to it again and again, chasing that perfect crust and pillowy crumb.
Let’s dive into the world of bolillos—what makes them special, how to make them, and why they deserve a place in your baking routine.
What Are Bolillos?
Bolillos are traditional Mexican bread rolls that trace their origins back to the influence of French baking during the 19th century. Think of them as Mexico’s answer to the baguette—but shorter, sturdier, and uniquely adapted to local tastes and uses.
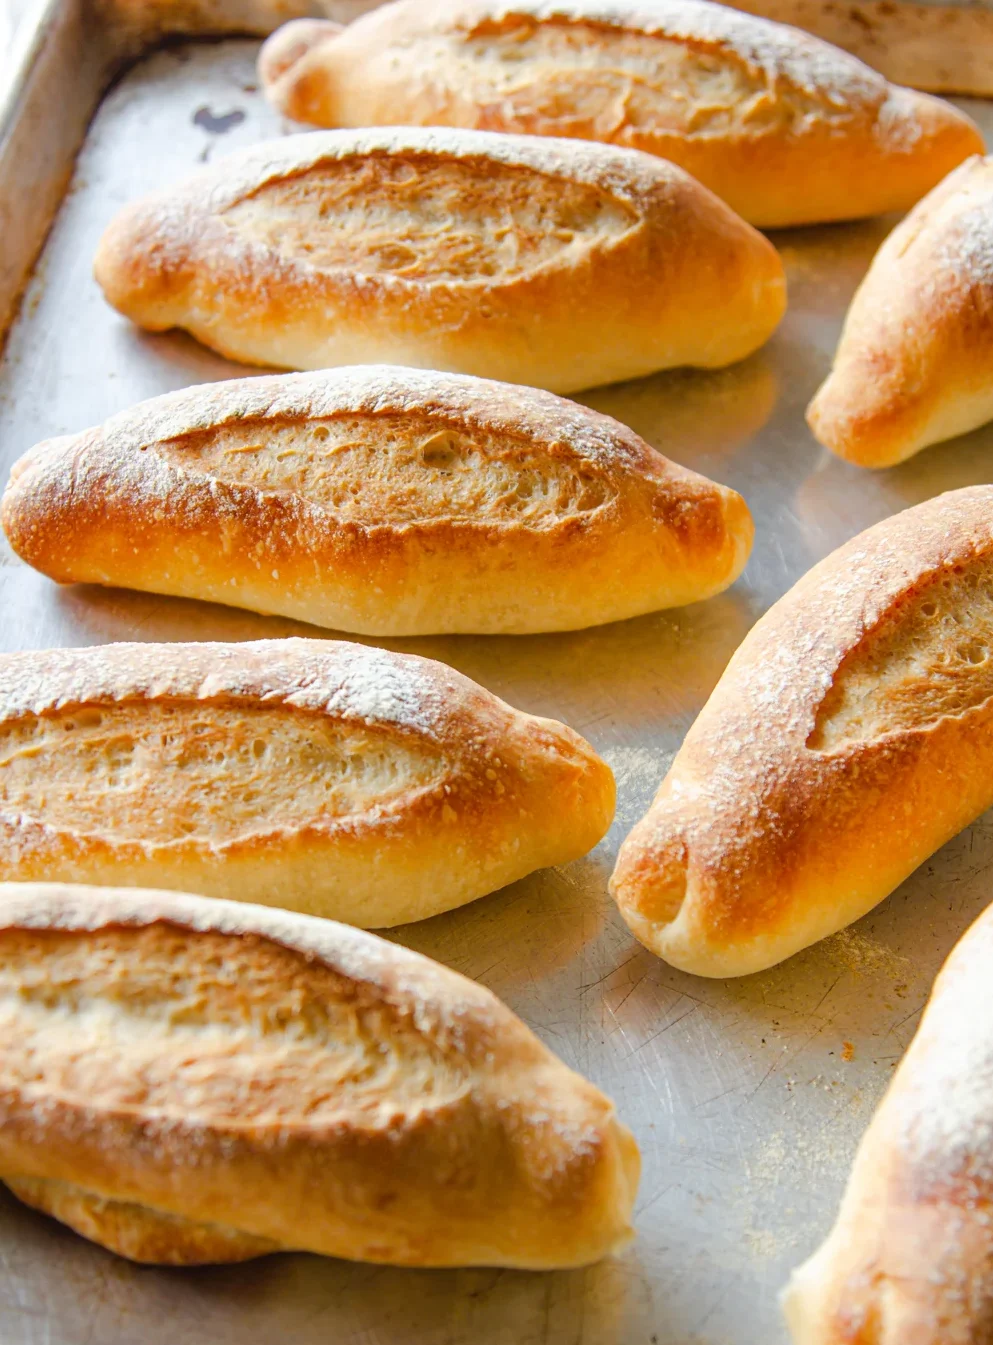
They’re recognizable by their slightly torpedo-like shape and a single slash along the top, which expands during baking to create a rustic, bakery-style finish. The crust is thin and crisp, while the inside is soft, slightly chewy, and perfect for soaking up sauces or holding fillings.
Bolillos are incredibly versatile. They’re used to make tortas (Mexican sandwiches), served as a side for dishes like pozole or menudo, or even eaten on their own. Day-old bolillos are often repurposed into dishes like bread pudding or migas, proving that nothing goes to waste.
The Ingredients: Simple but Essential
One of the beautiful things about bolillos is their simplicity. You don’t need fancy ingredients—just a few pantry staples and a little patience.
Here’s what you’ll need:
- 3 cups of all-purpose flour (or bread flour)
- 1 ¼ cups of warm milk
- 2 ¼ tsp Active dry yeast or instant yeast
- 2 tbsp sugar
- 4 tbsp unsalted butter (ensure it is not too hot when adding in)
- 2 tbsp flour (grab this out of your 3 cups of flour— this will be used to activate the yeast shown in step 1 below)
- 1 tsp salt
That’s it. No eggs—just the basics. And yet, from these humble ingredients comes something extraordinary.
The Process: Step by Step
1. Activating the Yeast
Start by combining your active dry yeast with warm milk, sugar, and 2 tbsp of flour. Let it sit in a warm place, covered, for about 10–15 minutes or until it has doubled. This step ensures your yeast is alive and ready to work its magic. You will be looking for a foamy consistency.
2. Mixing the Dough
While the yeast activates, in a large bowl combine your flour and salt. Ensure it is mixed thoroughly. Slowly add the yeast mixture. Lastly, add the butter – ensure that it is not too hot or it will kill the active yeast (should be warm to the touch). Begin mixing until a dough forms, it should be slightly sticky but manageable.
Mix the dough in a stand mixer on medium high speed for about 12-15 minutes. Alternatively, knead out onto a floured surface for about 15 minutes. This is where the magic begins. As you knead, the gluten develops, giving the bread its structure and chew. You’ll know the dough is ready when it becomes smooth, elastic, and springs back when lightly pressed. You do not want the dough to be sticky.
3. First Rise
Place the dough in a lightly greased bowl, cover it with a damp cloth or plastic wrap, and let it rise in a warm place for about 1 hour, or until it doubles in size.
This is a waiting game—but it’s worth it. During this time, the yeast ferments the dough, creating air pockets that will later become that soft, airy crumb.
4. Shaping the Bolillos
Once the dough has risen, gently punch it down to release excess air. Divide it into equal portions—typically 6 to 8 pieces, depending on how large you want your rolls.
To shape each bolillo, flatten the dough slightly, then roll it tightly into an oval shape, tapering the ends slightly. This step takes a bit of practice, but don’t worry—rustic is beautiful.
Place the shaped rolls seam-side down on a lightly greased baking sheet.
5. Second Rise
Cover the shaped dough and let it rise again for about 20–25 minutes. This second rise gives the bolillos their final volume and lightness.
Just before baking, use a sharp knife or razor blade to make a single lengthwise slash on top of each roll. This allows the bread to expand properly in the oven and gives it that classic look. Lastly, brush warm water on top of the bolillos.
6. Baking
Preheat your oven to 425°F (220°C). For that signature crispy crust, place a pan of hot water on the bottom rack of the oven to create steam.
Bake the bolillos for 20–35 minutes, or until they’re golden brown color and sound hollow when tapped on the bottom.
Let them cool slightly—but not too long. Bolillos are at their absolute best when still warm.
Tips for Perfect Bolillos
- Use steam in the oven: This is key for achieving that crisp crust. Without it, your rolls may turn out softer and less authentic.
- Don’t rush the rises: Good bread takes time. Letting the dough rise properly ensures the best texture and flavor.
- Practice shaping: Your first batch might look a little uneven—and that’s okay. With each attempt, your technique will improve.
Serving Ideas
Once your bolillos are ready, the possibilities are endless.
Slice one open and fill it with meats, cheese, avocado, and salsa for a classic torta. Or serve them alongside a hearty soup, letting the bread soak up all those rich flavors.
For a simple pleasure, spread a little butter on a warm bolillo and sprinkle it with salt. It’s the kind of snack that reminds you how satisfying simple food can be.
You can even get creative—use bolillos as the base for mini sandwiches at a party, or toast slices for a crunchy accompaniment to dips and spreads.
The Joy of Baking Bolillos
Making bolillos isn’t just about the end result—it’s about the process. It’s about slowing down, working with your hands, and creating something from scratch.
There’s a certain rhythm to it: mixing, kneading, waiting, shaping, baking. Each step invites you to be present, to pay attention, to enjoy the transformation.
And when you pull those golden rolls out of the oven, the reward is immediate. The aroma fills your kitchen, the crust crackles as it cools, and you know you’ve made something real—something nourishing, comforting, and deeply satisfying.
Final Thoughts
Bolillos are more than just bread. They’re a connection to tradition, a testament to the beauty of simple ingredients, and a reminder that some of the best things in life take time.
If you’ve been hesitant to try baking bread, let bolillos be your starting point. They’re approachable, forgiving, and endlessly rewarding.
So roll up your sleeves, dust your counter with flour, and give it a try. Your first batch might not be perfect—but it will be yours. And that’s what makes it special.
Once you’ve tasted a homemade bolillo, warm from the oven, you may never look at store-bought bread the same way again.
How to Make Bollios: A Step-by-Step Guide
Ingredients
Method
- Start activating the yeast by combining your active dry yeast with warm milk, sugar, and 2 tbsp of flour. Let it sit in a warm place, covered, for about 10–15 minutes or until it has doubled. This step ensures your yeast is alive and ready to work its magic. You will be looking for a foamy consistency.
- While the yeast activates, in a large bowl combine your flour and salt. Ensure it is mixed thoroughly. Slowly add the yeast mixture. Lastly, add the butter – ensure that it is not too hot or it will kill the active yeast (should be warm to the touch). Begin mixing until a dough forms, it should be slightly sticky but manageable.
- Mix the dough in a stand mixer on medium high speed for about 12-15 minutes. Alternatively, knead out onto a floured surface for about 15 minutes. This is where the magic begins. As you knead, the gluten develops, giving the bread its structure and chew. You’ll know the dough is ready when it becomes smooth, elastic, and springs back when lightly pressed. You do not want the dough to be sticky.
- Place the dough in a lightly greased bowl, cover it with a damp cloth or plastic wrap, and let it rise in a warm place for about 1 hour, or until it doubles in size.
- This is a waiting game—but it’s worth it. During this time, the yeast ferments the dough, creating air pockets that will later become that soft, airy crumb.
- Once the dough has risen, gently punch it down to release excess air. Divide it into equal portions—typically 6 to 8 pieces, depending on how large you want your rolls.
- To shape each bolillo, flatten the dough slightly, then roll it tightly into an oval shape, tapering the ends slightly. This step takes a bit of practice, but don’t worry—rustic is beautiful.
- Place the shaped rolls seam-side down on a lightly greased baking sheet.
- Cover the shaped dough and let it rise again for about 20–25 minutes. This second rise gives the bolillos their final volume and lightness.
- Just before baking, use a sharp knife or razor blade to make a single lengthwise slash on top of each roll. This allows the bread to expand properly in the oven and gives it that classic look. Lastly, brush warm water on top of the bolillos.
- Preheat your oven to 425°F (220°C). For that signature crispy crust, place a pan of hot water on the bottom rack of the oven to create steam.
- Bake the bolillos for 10–15 minutes, or until they’re golden brown color and sound hollow when tapped on the bottom.
- Let them cool slightly—but not too long. Bolillos are at their absolute best when still warm.
Notes
- Use steam in the oven: This is key for achieving that crisp crust. Without it, your rolls may turn out softer and less authentic.
- Don’t rush the rises: Good bread takes time. Letting the dough rise properly ensures the best texture and flavor.
- Practice shaping: Your first batch might look a little uneven—and that’s okay. With each attempt, your technique will improve.